Create your own Image Manipulation Software ...
in ANY language!
PixMod allows the average developer to easily create their own Image Manipulation software
IN ANY LANGUAGE!
Version 1.1 Released! (1.74 MB)

Additions to Version 1.1
- Added version tag to XML file for backwards compatibility
- Includes 3 sample batch files to make running PixMod much easier
- Includes 2 more sample images
FAQ
- Why would I want to use PixMod?
- Why graphic file formats does PixMod support?
- What languages does PixMod support?
- What operating systems does PixMod run?
- What features are planned for version 2.0?
- How do I install PixMod?
- How do I run PixMod?
- How do I view the source code?
- How do I write my own module using C++?
- How do I write my own module using another language?
- How does PixMod work?
- Where is the reference manual and tutorial?
- Where can I find more sample modules?
- How do I add my modules to the library?
Why would I want to use PixMod?
I've heard people say stuff like "Image manipulation is an old technology" and
"there is nothing new you can really do in image manipulation". It reminds me of this quote.
"Everything that can be invented has been invented."
Charles H. Duell, Commissioner, U.S. Office of Patents, 1899
I see it differently. There are an infinite ways to manipulate an image and we've
barely begun to scratch the surface.
There are a lot of creative people who want to create their own software
but do not know where to start or have tried but find it is too hard.
PixMod lowers the bar and reduces the learning curve so you can hit the ground running.
I think one reason innovation has been limited is that it's not easy to write
image manipulation software. I know because I've tried before. Now there are many
Image Manipulation libraries out there but maybe they are not available in your language of choice.
Or maybe they are written in C++ and your C++ is a little weak. Or maybe they are only available
on Windows and you want to use it on Linux. PixMod will eventually be cross-platform but
for version 1.x it only runs as a Windows command-line app.
Another reason to use PixMod is that you want to manipulate images in some unique
way that is impossible with any current software.
Another reason is that it's fun and easy! You can have fun experimenting with different
ways to shred images and turn photos into art. Developers are creative people too.
Why graphic file formats does PixMod support?
Version 1.x only supports Bitmap (BMP) images for Input/Output but version 2.0 will support
all major
raster image file formats.
What languages does PixMod support?
All languages that support these abilities ...
- Binary read/write of files
- Support of arrays
- Ability to convert strings to numbers and numbers to strings
The first modules available for PixMod are written in C++ but
the code base for a module is small and simple so you can easily port a module
to the language of your choice.
If you do port a module to a new language please share the source code of the
template to make it easy for others to code modules in that language.
What operating systems does PixMod run?
Version 1.x runs as a command-line app on 32-bit Windows.
The plan is to port future versions to other operating systems like Linux and UNIX.
If there is a demand, I will also create a GUI front-end for PixMod but its target audience
is developers who should be comfortable with command-line apps.
What features are planned for version 2.0?
- Support for all major raster image graphic file formats like jpeg, gif, png, tiff, etc.
- Built in basic image manipulation
- Backwards compatibility
For more info see the wiki about
version 2 or a
comparison of current and future versions.
How do I install PixMod?
Unzip pixmod1.zip into its own PixMod directory.
Use folder names when extracting.
It will create some sub-folders.
How do I run PixMod?
You could run PixMod first then a module or run your module first then PixMod.
The order does not matter because they will wait for each other.
If you can run the module from a command-line you could open two command-line windows,
one for PixMod and the other for the module but it would be easier to do it from a batch file
and have only one command-line. Batch file are provided as examples.
If you wanted to modify many images, run many modules or pass your modules parameters then
you should use
batch files.
It makes life much easier!
How do I view the source code?
The source code for PixMod (front-end) is currently not available
but the source for the modules is available.
PixMod will eventually be open-source.
- open PixMod/template/module.cpp
- The code you write is in function ChangeImage( )
Below is the code that the sample module uses to rotate the image 180 degrees.
This code is located in PixMod/template/module.cpp
for (int i=0; i<Pixels; i++)
OutputImage[Pixels-i-1] = InputImage[i];
You can do a lot with a few lines of code! The pixels are in the array InputImage.
You do your manipulation and copy the images into OutputArray and you're done.
The image is stored as 1D but there are functions that convert between
1D and 2D. It's designed this way to keep it simple so people can easily
code in other languages where maybe 2D arrays would be hard or impossible.
How do I write my own module using C++?
- Make a new sub-directory in the PixMod directory
- Copy PixMod/template/module.cpp into that directory
- Modify the code in function ChangeImage( ), recompile and run with the same instructions above but change the parameter "module" to the name of your module directory
- Visit the PixMod wiki for full details
How do I write my own module using another language?
- Convert PixMod/template/module.cpp into another language
- Convert common/funs.h into another language
- Visit the PixMod wiki for full details
How does PixMod work?
The diagram below shows how PixMod will work with multiple modules for version 2.0.
For version 1.x it can only run one module at a time. But it illustrates how each module
can be written in a different language. PixMod will also be backwards compatible
so when newer versions come out that break older modules, you can tell PixMod to communicate
with older modules using the version XML file they expect.
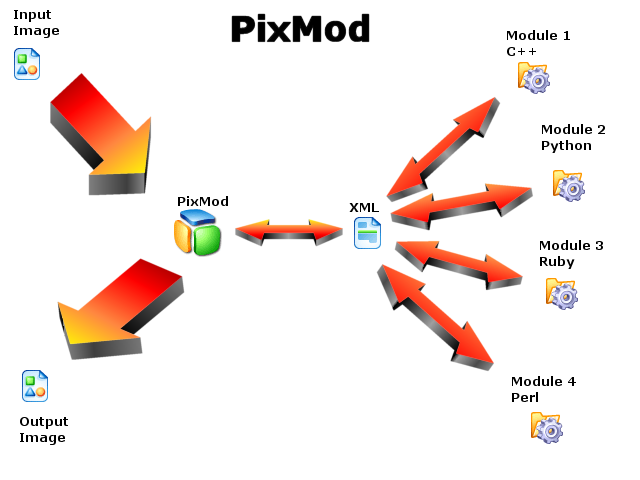
- PixMod (the front-end) reads in the bitmap
- It then saves the XML file to the sub-directory you specified
- The module (the back-end) reads the XML file
- The module manipulates the image
- The module writes the XML to the PixMod directory
- PixMod reads in the XML file and writes out the bitmap
- Because PixMod converts the file to XML, the module can be written in any language
- The module only needs to read and write the XML file
- The module does not need to know about different file formats like jpeg, gif, bmp, tiff, png, etc.
Where is the reference manual and tutorial?
See the links below for more information.
The wiki contains all of the reference material.
The blog tracks the development of PixMod newer versions.
The forum is for discussing PixMod with other users.
Where can I find more sample modules?
Below are links to modules in the PixMod Module Library.
- Negative - demo module: how to convert an image to its negative. See the blog post.
- Grey Scale - demo module: how to convert an image to grey scale. See the blog post.
- Horizontal Blend - demo module: how to blend an image with its mirror self.
- Template - demo module: rotates image 180 degrees with 2 lines of code
How do I add my modules to the library?
Feel free to contribute your own modules to the library in any language!
Send all modules to
me. Source code is required.
Please include documentation about what the module does and how it works plus your contact info.
The source code is required. Also specify which version of PixMod it is written for.